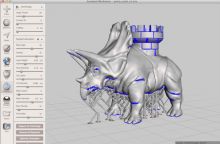
Autodesk Meshmixer
Endless amounts of press discuss how 3D print technology gives anyone the power to make anything. It’s an exciting movement, and there’s no doubt that such a proposition is true in many ways – but in reality, we’re faced with a number of challenges before the printing even begins. For those not trained in CAD and virtual design techniques, the software itself can be very difficult to understand. Additionally, even just knowing which software to use and where to get it can be enough to discourage a novice 3D printing enthusiast.
In an attempt to solve these initial problems, Autodesk Meshmixer was developed, and has recently updated with a nice all-in-one suite – making it a brilliant sculpting, mixing, painting and 3D printing application. It’s free too – which makes it even more accessible to those unable to invest in a software option that they may not choose to master. When your design is complete via Autodesk Meshmixer, you can click the “Print” button which offers a list of simple analysis and layout tools to arrange, heal, and even print directly to a 3D printer. See the video below for a quick teaser of what is new.
The integration with 3D printers is intended to make the process to 3D printing even more streamlined. The healing tools require no training at all and will make just about any model printable. If you want to save time and material, assign your model a wall thickness so that it’s hollow inside. Also, the generation of support material is an artform in itself. Of course, experienced Meshmixer users can still find the original re-meshing, sculpting and healing tools that they’ve grown to love for that extra level of control – but the support here for those new to 3D print technology is incredibly encouraging.
Here are our top 5 Meshmixer features for those interested in getting to grips with the software:
5. New feature: “Make Solid” Now you can mash a bunch of meshes together and use “Make Solid” – which will heal them all together into a 3D printable object. Check out this Danielle Steele-like book cover whipped together below from some 123D Catch captures downloaded from 123dapp.com.
4. Automatic repairing Whether it be a messy, unprintable model, or you just want a sanity check for 3D printing your refined creation, the addition of an option to automatically “Repair Selected” is an easy and hands-free way to make any model 3D printable. Find it in the print bed layout screen.
3. “Hollow with Wall Thickness” This will save you time and material when printing. This essentially gives your model a wall thickness that you decide, making it a hollow print rather than a solid print with infill. You can visualize how thick your model is with the slick see-through representation.
2. Analysis tools: Strength, Stability, and Slicing. This unique set of tools is perfect for visualizing how your printed model will look and perform before printing it. Particularly good is the “Stability” tool where I can make sure my print will stand upright. Using this, I can push the limits of how I mix and sculpt, ensuring the printed object will not topple over – very practical.
1. Print direct to your 3D printer (Windows 8.1 supported). Windows 8.1 users will have the option to print directly to their printer, bypassing the need to go through another app such as Makerware, eliminating this extra step.
Perhaps what’s most interesting here is that companies like Autodesk are recognising the need for simple, accessible programs which allow people to develop their skills in virtual modelling and 3D printing. 3D printing’s recent boom into popular culture over the last few months is evidently having some major effects not only on user experience and expectation, but also on the numbers of people who want to engage with the technology. Let’s hope that these general skills can be put to good use – why not give Autodesk Meshmixer a try? It’s free for Mac or Windows (32/64 bit) at its brand new page: 123dapp.com/meshmixer.